26 June 2015

Projects I Want to Tackle

I think I may have hit my nesting phase a week shy of the second trimester.  Recently I have spent many lazy evenings on the couch perusing pinterest to find delicious projects I would like to complete by October for my little humans.  I took stock of my juvenile prints and have a few items picked out to make receiving blankets, burp rags, bibs and their special baby quilts.

Here's a smattering of links I would like to use as "pinspiration" for these projects.

http://creativelychristy.blogspot.com/2010/03/tutorial-carseat-canopy.html?m+1
From website listed above

I will be doing double duty on this one!  Two babies, two car seats.  Perhaps this might be a way to differentiate the children once they arrive.  Her tutorial seems simple and straight forward.  Many of these car seat canopies use minky.  I seldom have negative feelings, but I HATE MINKY.  I am just too much of a spazz to use this fabric.  Especially on something that will be getting a lot of wear and tear.  Minky makes such a mess just by cutting it, let alone dealing with its propensity to stretching all over the place.  My babies are due in December, so they will need something that will help them maintain their body heat.  I think this will be an easy option and keep me from having to purchase more fabric.  I am determined to use up my stash!

http://www.stayathomeartist.com/2012/07/reversible-flannel-receiving-blankets.html?m=1


From website listed above
I have actually MADE these before eons ago.  I really like using coordinating flannel.  The two flannels stick together making cutting and sewing a treat.  I may not round my corners as the tutorial shows because I am not adept as sewing "round" stuff.  I want to use a quilting cotton and a flannel on mine.  I think that will be a nice alternative because during spring the temperatures in North Carolina have a tendency to fluctuate.  I feel like having ALL flannel might cause baby heat stroke.  No one wants that.

https://sewshesews.wordpress.com/2010/04/08/quilted-patchwork-bib-pattern-and-tutorial/


Photo from website above

I have loved these bibs since I first spied them on pinterest.  I think it would be a PERFECT project for all sorts of my fabric and batting scraps.  Her tutorial is very detailed, but I wonder if I can conquer my fear of curves.  I may modify the pattern and make the bottom portion more square and only deal with the curves around the neck.
I love the idea of fussy cutting shown on this one


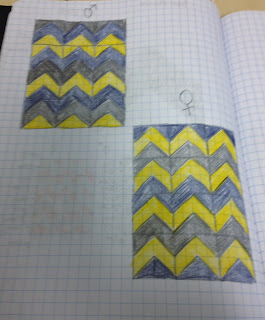
I have also sketched out similar chevron quilts for each baby.  In my heart of hearts, I would love one of each.  When I sketched these quilts I figured the one on the left "felt" more masculine and the one on the right "felt" more feminine.  I am not sure if I want to use subtle prints for each color or use solids.  I still have a TON of Kona Navy left over from projects, {Deanna's Dresden and Naughts and Crossesbut I also have a celestial themed print that has swirls and stars with a dark navy background.  I want the grey to be a true grey, not charcoal.  I haven't really found the color I want to use for the grey yet.  I may not attain my goal of only using what I have on these ones.  I think it is allowed, though, since these will be the babies special quilts.  I want the yellow to be bright and sunny.  All of these colors are gender neutral, but complement each other well.  

The babies will share a room as we live in an apartment.  I plan on decorating primarily with Navy, Grey and Yellow.  I registered for yellow and white chevron black out curtains for their room.  I also plan on using a bunting I made as decoration for an anniversary party last year.


I also scored some free terry cloth fabric in white and cream to use in making burp rags.  I also plan on embellishing some cloth diapers with strips of fabric or trim.  Yet another way to use up my stash.

Due to feeling sick and tired, I haven't touched my sewing machine at ALL through the first trimester.  For all my mommy and or quilting friends, is this too ambitious for a first time mommy carrying twins?  What would your suggestions be on my baby quilt plans?

Let me hear your comments!


01 June 2015

Making McNays

It has been quite some time since I blogged about quilting or anything else.  I still feel like I have lost some of my quilting mojo (see last post here).  I have a friend who is welcoming a new arrival in July and I have yet to finish her quilt TOP let alone quilt it and bind it.  Perhaps her little fella will just have to be patient.

I blogged about our first IVF attempt here, unfortunately the little embryos didn't take. :(

We tried again in April and my hormone levels were indicating a pregnancy.  Both my husband and I were over the moon!  we were so excited.  We got to see the heart beat and the first little images of our embryo in late April.  I proudly hung my ultrasound image on the fridge.
After implantation the second time


When working with fertility clinics they generally keep patients under their care until the first trimester is over.  I go in for ultrasounds every two weeks.

Last week, Wednesday, my husband and I went for the second ultrasound and the doctor asked how many embryos took, I announced "One." and he said "Well I hardly ever miss, but it looks like there is two in there."  My husband said "Yeah, that's about right" while I was speechless and a bit flabbergasted!

I wondered why I needed to move into maternity pants so quick.  I really thought my weight gain was getting out of control.  It turns out that I am right on track with twins.  Many of our loving friends have donated outgrown baby toys, or have promised us baby gear.

We are so humbled by the generosity of friends and family.  Expecting twins the first go around will be challenging.  I will have to quit my out side the house job in order to care for them.  That is a bit scary for me since the longest I have been without a job is 6 months.  I often ask myself if I will have the mental fortitude and physical stamina to meet the demands of a stay at home mom.  It will be quite a hit to our household income when I leave the work force.  One of the biggest items we are in need of is a decent washer and dryer.  We were gifted a set from the 1970's complete with faux wood paneling!  Unfortunately, the washer is not wringing out as much water as it should, AND they are very energy inefficient.

I hope to continue to tutor students and dare I say sell quilty items to generate a bit of extra income.  

That may have to happen once the babies are a bit older and less demanding.

So here's to the two little people I am currently "making"


17 April 2015

I've Lost that Quilting Mojo

After finding out our first IVF attempt was not successful, I fell into an emotional and creative funk. I am lucky, though, my husband was supportive during this time. As I look back, I can tell having my hormones decrease quickly greatly contributed to the depressed state. Subsequently, I have had a difficult time trying to get quilting again.

I decided that I would begin to tackle some of my WIP projects.

I went back to my Block of the Month project, a free class offered by Craftsy taught by Amy Gibson, in an attempt to conquer my FEAR apprehension of paper piecing. I dug through my box of fabric I have set aside for this project and found some pieces that were still big enough for me to use.  I picked my fabrics, cut out my paper templates and "sewed" over the lines to perforate the paper.  I did my best to keep my fabrics similar - meaning having the same fabric in the same spot for each piece.  
I chose a patriotic theme for this project

Honestly, I had a hard time keeping fabric A, fabric B and template all together.  I had to rip out some of my seams which resulted in a casualty of one of my templates. 
MAJOR FRUSTRATION

Some of my fabric pieces don't go all the way out to the edge of the template.  I found that super frustrating.  
Semi-Complete parts of the paper piecing block

So here I am asking the bloggosphere - what are your paper piecing tips and tricks.  how do you get those layers to stay straight and keep your template together?


11 February 2015

Musing Impending Implantation

Ken and Me on the Cruise in October
Hello Blogging, Quilting, and Actual in Person Friends!  I haven't been doing much in the way of completing or starting new quilting or sewing projects.  Instead, I have been preparing for embryo implantation.  Each night I get a shot or two in my hip area, take a myriad of medications or supplements and try not to "stress out".  

I am so thankful for the outpouring of love sent to us from our local and far away friends.  One woman offered to bring dinner without even asking!  My brother and dad are driving to North Carolina from Washington State to be here and help me while I recover.

The recovery part isn't so bad, its the three days of bed rest that might cause me to lose my marbles.  I think the hardest thing for me will be that I will have time at home, but not be able to sew.  For the first two days I have to be horizontal as much as possible.  I believe it would be quite challenging (and quite a sight) to sew in the prone position.  The second day I am able to take a shower, which is nice.

Our Embryos are at the blastocyst stage
Many have asked how I feel about the IVF process, and especially embryo implantation.  I am cautiously optimistic.  I have to stave off the impulse to purchase maternity clothes and make all sorts of baby quilts. I want to buy all sorts of tiny clothes and wash them and fold them and put them away in the dressers we have for our tiny humans.  I want to feel excited, hopeful and plan for the future of our tiny humans.  I want all those things; but I don't know how I will deal with the disappointment if the embryos do not implant.  I don't know how I can go thorough another two months of appointments and needle sticks.  Or even more scary, what if our child is born but lives for only a short moment.  These are also things I think about.  These are questions I don't have answers to.  I almost feel like there are more people excited for me than I am excited for myself.


Hoping to end up with one of these


30 January 2015

Finishes for Friday

I busted it out this week and finished one quilt, one pin cushion, and one quilt top.

The baby quilt was blogged about here.  I added a picture to share in case you don't want to jump over to that page.


My pin cushion was made from a scrap piece of muslin and an orphan block made from scraps of the WIP Teal Flying Geese Chevron.

I decided to make this pin cushion because I didn't like having to get up from across the room to grab the magnetic one once I decided to sew whatever I pinned.

I put a scrap piece of batting on the back of the block.  I practiced my FMQ skills and stiched the back to the top, trimmed my corners and turned it right side out.  I read somewhere that it was a good idea to add rice or walnut shells to add weight to pin cushions.  Being dedicated to using what I had on hand, I used rice.  I stuffed the rest with some polyester stuffing I had left over from another project.  

Pay no attention to the rouge hand sewing!

I also sewed the blocks together for Naughts and Crosses.  I love the play of the bright yellow contrasting with the deep navy.  I first found the yellow and navy floral prints all bunched together on the bolts.  My heart squee'ed (is this a word??) for joy.  I then collected some more yellow and navy fabrics from my stash.  I even picked up a vintage yellow and light blue floral print and incorporated it into a couple of the blocks.

Another quilt I cannot fit in the picture UGH!

 I tried my best to match and nest seams, but as with all of my projects - I had to fudge a little.  I had a hard time getting the O or the Naught blocks through the needle.  There was quite an intersection of seams and layers there.  I mitigated that by encouraging the blocks through the sewing machine - I tugged on the blocks as they were coming through the back side of the needle.  I am pleased with the way this top turned out.  I need to add a border, but I am stuck with what color and how thick the border should be.  This quilt will be for my Husband so he has something nice to snuggle with on drafty winter mornings.


 I think I will use an all over meandering FMQ for this quilt.  I am thinking about using navy Aurifil for the quilting.

I haven't decided for certain.  What do you think?  Would you use a dark thread or a light thread to quilt?  Would you add a border?  What color border would you add?

Please leave your feedback in my comments section.  Thanks!


29 January 2015

Shameless Promotion for Amy

Being a quilter kind of gets you into a "club" of sorts where other quilters, no matter your skill level, always remember you when there is a sewing evening afoot.  

This is Amy.  I stole this pic from her blog.
I Met Amy about three years ago through church.  She learned that I quilt and periodically, when her husband is out of town or camping with the boy scouts, she hosts a sewing night.  These events are always full of ladies, sewing projects and yummy snacks.  We settle in with our various projects and give each other feedback.  I have met so many wonderful ladies through these evenings.  Amy always passes on her well used magazines or random scraps that she is getting rid of "gives away prizes" at the end of the night.  Generally there is a charity quilt for people to learn on.

About 4 months ago Amy emailed me and asked me to help edit a book wrote.  I felt honored that she would ask me for help.  At first, I thought she asked me to edit grammar and text.  But NOO!  Amy wanted my feedback on the explanations and clarity of her instructions.  I guess she needed a quilter who is a bit "dangerous". I can get myself in a quilting pickle, but am not always the best at getting out of said pickle.

Amy's Book Frazzled Fancies
 Amy truly has the mind of a quilter.  She took the pages for each topic and taped them together in a long column.  Her tutorial for her Frazzled Fancies blocks were deliberate and easy to understand.  She didn't waste an inch of space on the page and references many pictures to help readers and quilters understand how to make the block.  The best thing about Amy's method is her creative use of materials, and her attitude about quilting.  She believes that mistakes are going to happen, and precision quilting isn't the only way to quilt.

Check out her blog and etsy store


27 January 2015

Oh My Heart Finish

I started this project just a wee bit ago.  I am feeling SUPER accomplished for THREE reasons.

Reason the First  - It is the quickest "from concept to finish" quilt I have EVER finished.  I blogged about that HERE.  I started January 17 and finished it January 26.  


Planning Phase
Pieced and in Strips - rough lay out
Reason the Second - I sewed from just my stash.  When I first was inspired, it was quite late at night and I knew I needed to stick to what I had on hand.  Generally, things are kinda lean at El Casa del McNay around this time of year anyway.  PLUS like most quilters I don't use the fabric as quickly as I buy it.  I have scads of random scraps that I just need to cut into usable bits and put in my storage containers.  I have them neatly labeled with the size of the squares.

Quilt back with left over purples from my stash

Reason the Third - I used Free Motion Quilting on this project! (woot woot)  Ever since my first pieced quilt fiasco (read about that HERE) I am gun shy about FMQ.  I made some of the same mistakes, but I took the time to pick them out and make do with what I had. 


FMQ and Straight line. <3 that scrappy binding
Showing off the drape
I did learn some more quilting lessons.  I should have spray basted and use more pins to baste this quilt.  I also should have ironed and starched the top.  I think both would help with the shifting.  This size was less intimidating than other quilts I completed on my home machine.  


Finished and my *heart* is happy :)

I am overall pleased with how nice it washed up.  It's true that the quilting can hide a multitude of quilty sins!  Perhaps quilty inexperience is the better term.

My Husband told me that the quilt looked like a broken heart.  He felt the low volume squares and the light pink squares didn't provide enough contrast.  I used straight line quilting on the heart squares and meandering Free Motion Quilting on the low volume squares and the border.  I think the difference in quilting helps the heart shape to pop out more.


All wrinkly from the first wash.

 What would you do to make the heart "pop"?  Have you ever had a quick finish?  Tell me in the comments below!  I love your feedback!


22 January 2015

What I Learned...My First Pieced Quilt


Back in the days of yore when I decided to start quilting, I mean quilt for real; not just sew some fabric and use yarn to tie it up, I went to google and found an easy quilt pattern HERE at www.allpeoplequilt.com.  It seemed easy enough.  I grabbed my trusty 3x12 inch ruler, self-healing mat and set to work.
What the quilt was supposed to look like (from apq.com)
I printed the directions and went to a few different fabric stores and searched through their remnant bins and their fat quarters.  Once I had decided on my bright colors, I brought home my fabric washed it and began cutting.  Against my better judgement, I will share pictures of my first quilt.  It will illustrate the lessons I learned.


What I Learned Making my First Pieced Quilt

  • Lesson One - Don't sew your first block until you have the rest of the fabric cut for ALL BLOCKS. This way when I have time - even if only a half hour, I can sew a block together and set it aside for adding to the rest of the quilt.
  • Lesson Two - Don't freak out when you make a mistake.  Sewing your first pieced quilt means you will make mistakes.  I found that when I made the most mistakes was when I was cutting the various strips for the block.  If I had done all the cutting at once, I could have got into a rhythm and made fewer mistakes.  I would have also known earlier in the process that I didn't buy enough background fabric.
  • Lesson Three - Ask for help.  Find someone who has quilted before you and ask for help when you get stuck.  I should have asked my friend Tricia for advice.  She was not a huge quilter, but had taken a class before.  That is one more class than I had under my belt.  Even if I didn't know Tricia, I should have asked at a quilt shop.  People in the quilting community are willing to help a newbie.  I also find loads of help looking at tutorials on youtube.com and searching quilty blogs.
  • Lesson Four - If it feels like a short cut, then you're probably not doing something right.  When I was sewing my completed blocks together, I used a pin every foot or so.  (the blocks were only 12.5 in)  I sewed a whole row together and I sewed the blocks wrong.  I had to pick my stitches, consult my print out and start over.  In quilting, being a 1/4 inch off is a big deal.
    I thought the binding would make up for having an uneven quilt back
     
  • Lesson Five - Square Your Blocks.  My blocks had all sorts of jagged ends.  Some strips of the blocks were too long, others just barely made it to the 12.5 mark.  I decided that seam allowance would hide most of my mistakes and the binding would cover the rest.  If I had known to square them, then I would have to fiddle with them less. 
  • Lesson Six - The top speed of the sewing machine is not for all projectsSewing two pieces of fabric together is one thing, and an experienced seamstress can go full-tilt.  As a beginner, it is ok to take your time.  Learn the quirks of your machine.  If you know you need to start needle down, do it.  If you know you struggle sewing a straight line, slow down.  Eventually your skills will allow you to sew faster.  This is especially important for Free Motion Quilting.  Too fast, you skip stitches and get eyelashing.  Too slow, your bobbin thread will not like you.
This is what happens when you try to quilt too fast


  • Lesson Seven - Make sure the product you have is the right product for the job.  I was super afraid of Free Motion Quilting.  I just couldn't handle making huge mistakes.  I made a few pot holders for practice (like making and sewing binding).  I quilted them using straight line quilting.  My little quilt sandwiches were manageable on that scale.  I was apprehensive with Free Motion Quilting such a huge thing, so I bought a polyester fusible batting for this project.  It was on clearance and I felt good about the price.  (this was before the giant roll of warm and crafty I bought)  I either did not pay attention to the directions or had my iron too hot, but I had to peel the back off of my sandwich two or three times because it kept wrinkling up.  Finally I just started quilting "the good spots" and that caused the fabric to shift all over the place. 

I quilted a fold on the back of my quilt - should have pin basted too!


My Version - check out that jagged edge